mikbox74/yii2-chl Yii2 extension for Chaldene Admin Template
Yii2 extension for Chaldene Admin Template
The extension adds support for the Chaldene Admin Template markup.
This extension includes easy applicable asset bundles, HTML layouts and basic widgets.
Installation
Your best CLI-friend will help you with this:
composer require mikbox74/yii2-chl
Starting the party
For beginning you must configure view component:
return [
    //...
    'components' => [
        'view' => [
            'class'   => \mikbox74\Chaldene\ChaldeneView::class,
            //...
        ],
    ],
    //...
];
The mikbox74\Chaldene\ChaldeneView overrides system layout path and makes some nice magic. For more magic you can use following properties:
- layout (string) - one of the three layout types:
topnav(main menu on top),sidenav,sidenavhf(main menu at left). It's strongly recommended to use suitable constants frommikbox74\Chaldene\ChaldeneLayouts. - fixPage (boolean) - makes
app headingandapp footerfixed while you scroll the page. - fixSide (boolean) - makes
side heading,side footer,app headingandapp footerfixed while you scroll the page. - fixMain (boolean) - makes
main heading,main footer,app headingandapp footerfixed while you scroll the page. - boxed (boolean) - limits the width of the page.
- showTitle (boolean) - Show the page title inside
main headingpanel. - rtl (boolean) - Right to left content direction.
- widgets (array) - Config array where in you can explain how some widgets must be placed inside the view.
Themization
Since 1.1.6:
Look inside mikbox74\Chaldene\ChaldeneThemes to use its constants:
return [
    //...
    'components' => [
        'view' => [
            'class'   => \mikbox74\Chaldene\ChaldeneView::class,
            'colorTheme' => \mikbox74\Chaldene\ChaldeneThemes::PETER_RIVER,
            //...
        ],
    ],
    //...
];
Before 1.1.6:
You can set one of these by configuring the assetManager component. Example:
return [
    //...
    'components' => [
        'view' => [
            'class'   => \mikbox74\Chaldene\ChaldeneView::class,
            //...
        ],
        'assetManager' => [
            'class' => \yii\web\AssetManager::class,
            'bundles' => [
                \mikbox74\Chaldene\Assets\ChaldeneAsset::class => [
                    'theme' => \mikbox74\Chaldene\ChaldeneThemes::PETER_RIVER,
                ],
            ],
        ],
    ],
    //...
];
Themes do not differ much from each other but may be you will like this feature ;)
More about widgets placement
I recommend to set up widgets in special file:
return [
    //...
    'components' => [
        'view' => [
            'class'   => \mikbox74\Chaldene\ChaldeneView::class,
            'widgets' => require 'widgets.php',
        ],
    ],
    //...
];
widgets.php:
return [
    'app-logo' => [
        'widget1',
        'widget2',
        'widget3',
        //...
    ],
    'mainmenu' => [
        'widget1',
        'widget2',
        'widget3',
        //...
    ],
    'app-search' => [
        //...
    ],
    //...
];
The first level is an associative array with the pairs 'place name' => 'widgets list in this place'.
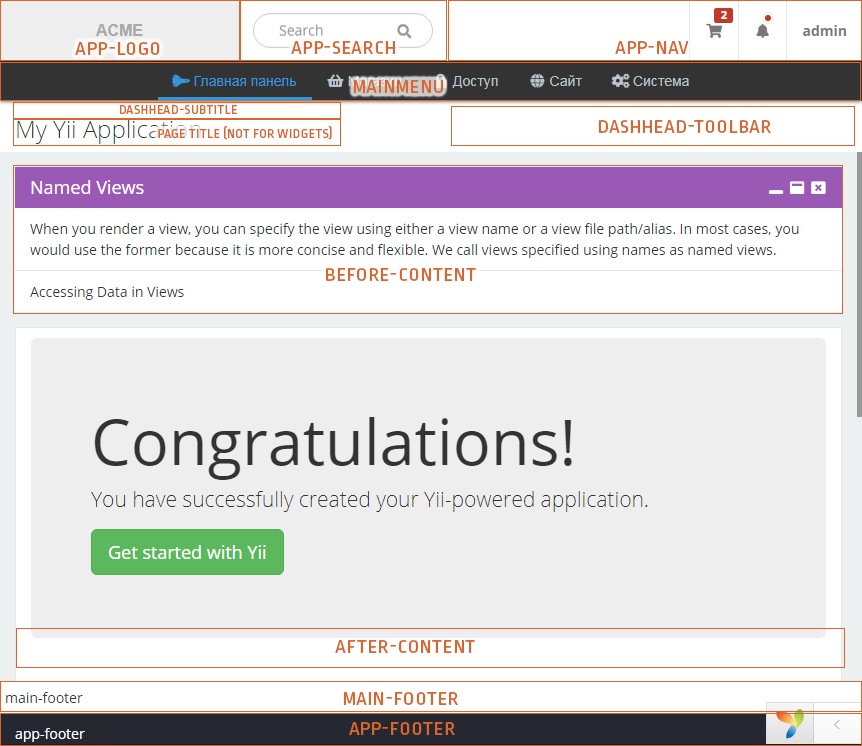
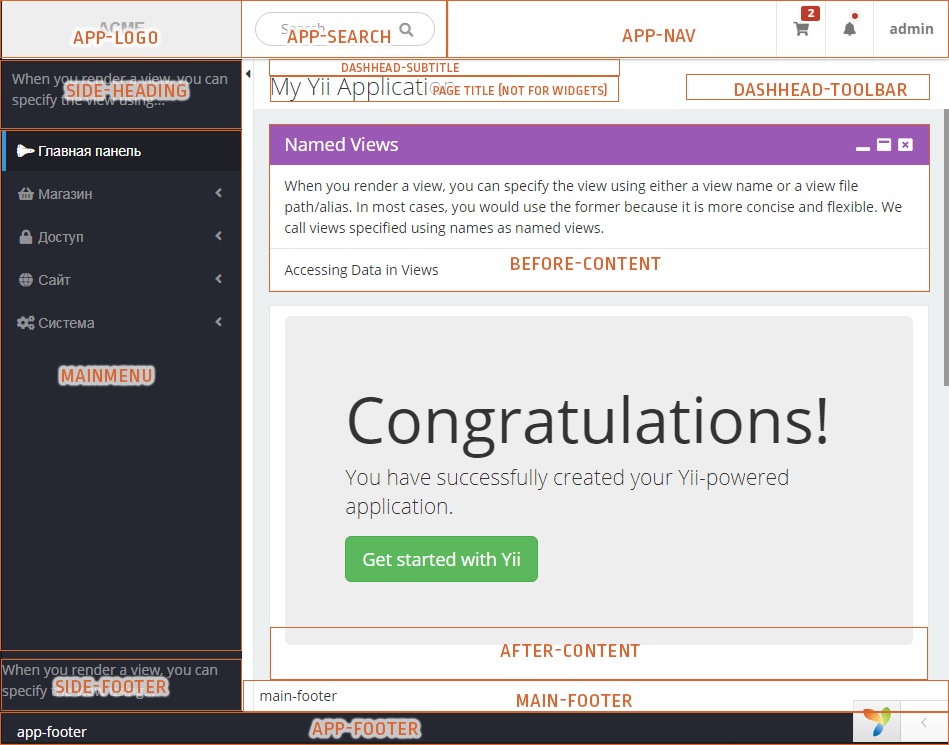
The template has following places:
- app-logo
- mainmenu
- app-search
- app-nav
- dashhead-subtitle
- dashhead-toolbar
- before-content
- after-content
- main-footer
- app-footer
- side-heading (only
sidenavandsidenavhflayouts) - side-footer (only
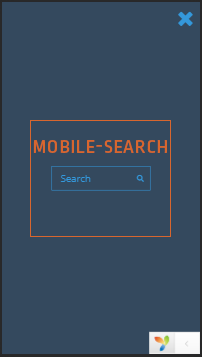
sidenavandsidenavhflayouts) - mobile-search (visible on small screens after pushing search button)
Next level is the plain list of widgets. Every widget can be configured by three ways:
- Plain text string. It will be placed right inside without any changing.
- Configuration array with 'class' element and any properties of the specified class (Yii-way).
- Anonimous function returns a class configuration array (like above).
In brief about widgets
mikbox74\Chaldene\Widgets\AlertNavitem- created to view some important information with icon, badge and dropdown list of messages. Add it in place inside UL menu and be happy.mikbox74\Chaldene\Widgets\Box- views content inside nice blocks (same as TWBS panes but little mode advanced).mikbox74\Chaldene\Widgets\Breadcrumbs- crumbles everywhere on your site.mikbox74\Chaldene\Widgets\Logo- shows your (or our) logo image in two wariants: small for mobiles and larger for other screens.mikbox74\Chaldene\Widgets\Message- a twin of\common\widgets\Alertfrom the Yii2-advanced app skeleton. It appears automatically and not need to be added in any place.mikbox74\Chaldene\Widgets\MetisMenu- this is the pop king in town. Add it wherever in you want to see awesome adaptive multilevel menu.mikbox74\Chaldene\Widgets\SearchForm- simple little search form with input and knob.mikbox74\Chaldene\Widgets\UserNavitem- can view a nav item with user avatar, username and dropdown user menu. Works properly inside UL tag (same asAlertNavitem)
Much more info see in DocComments.
And... Killer feature: decoratos!
Since 1.1.0 each widget from the package has a string propery decorator.
You can use it to specify path to any decorator file you want (see somthing about ContentDecorator to get how it works). For example you can create file @common/views/decorators/example.php:
<div style="border: 1px solid red; background: pink;">
    <?= $content?>
</div>
and set the path as decorator for any widget.
Handsome cheatsheet
Top navigation

Side navigation

Mobile search

Statistics
Downloads
GitHub Stars
GitHub Forks
Stats
5 github stars & 1 github forks0 downloads in the last day
0 downloads in the last 30 days
17 total downloads
Comments